I think Everyone needs a good no knead bread recipe on their Repitore, which is easy to make, doesn’t need any efforts, takes less time to make. This no knead bread is your answer. This professional looking Artisan bread has open pores, tastes great and is easy to make. Let me guide you step by step in making this no knead bread so you can bake great fool proof bread easily at home.
No Knead Bread Recipe
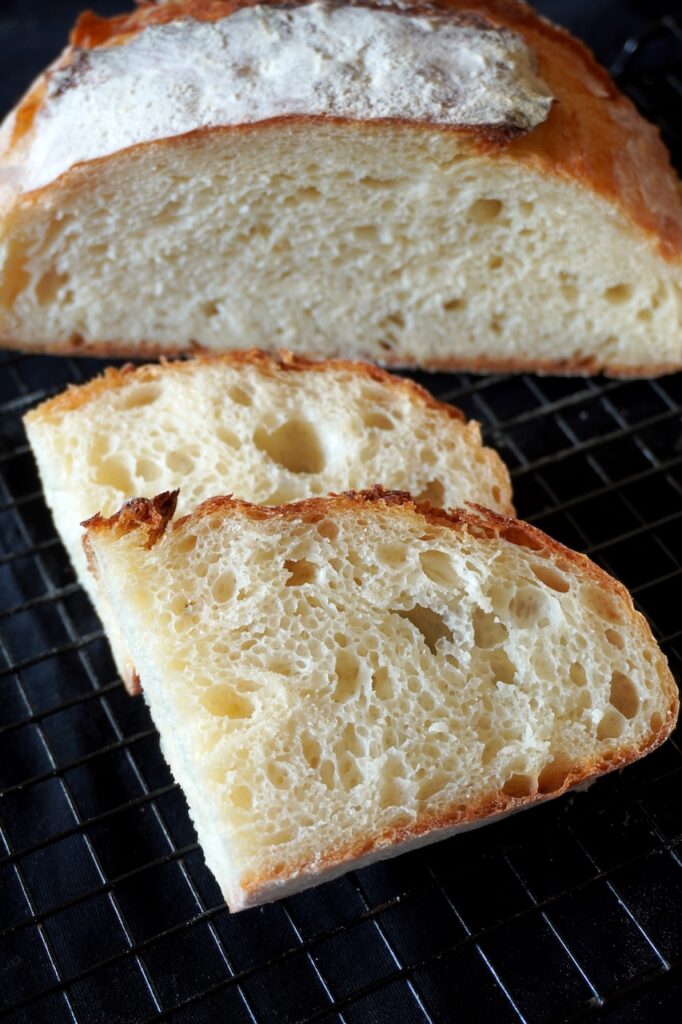
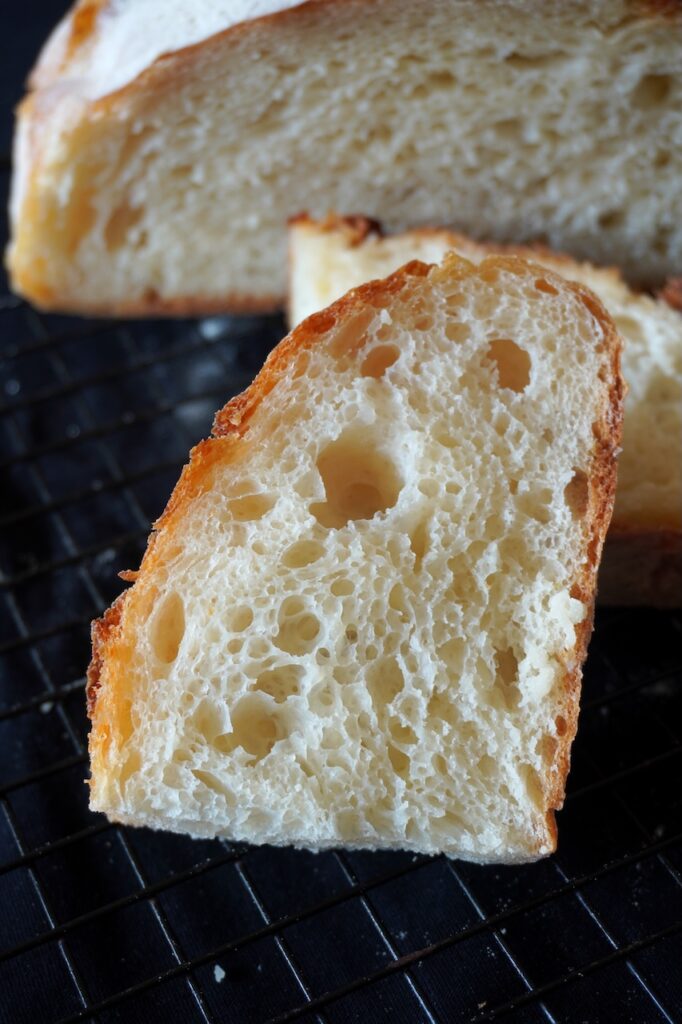
If you love sour dough bread or artisan bread, then this easy no knead bread is a good start for you. It looks similar to sour dough without sour taste with a rustic look which is made in a dutch oven.
Jump to:
It involves no kneading. You mix the dough in a bowl, do few sets of stretch and folds. Shape it roughly and bake. That’s it, simple to make yet looks so professional and crusty.
About No Knead Bread (Crusty Bread)
No knead bread is also known as dutch oven bread, rustic bread, crusty bread or artisan bread. Any which way you call, this bread is simply delicious. Check my no knead black bread recipe.
All you need is combine all of the ingredients in a mixing bowl, set aside to allow the yeast to do its work, do some stretch and fold to strengthen the gluten and bake.
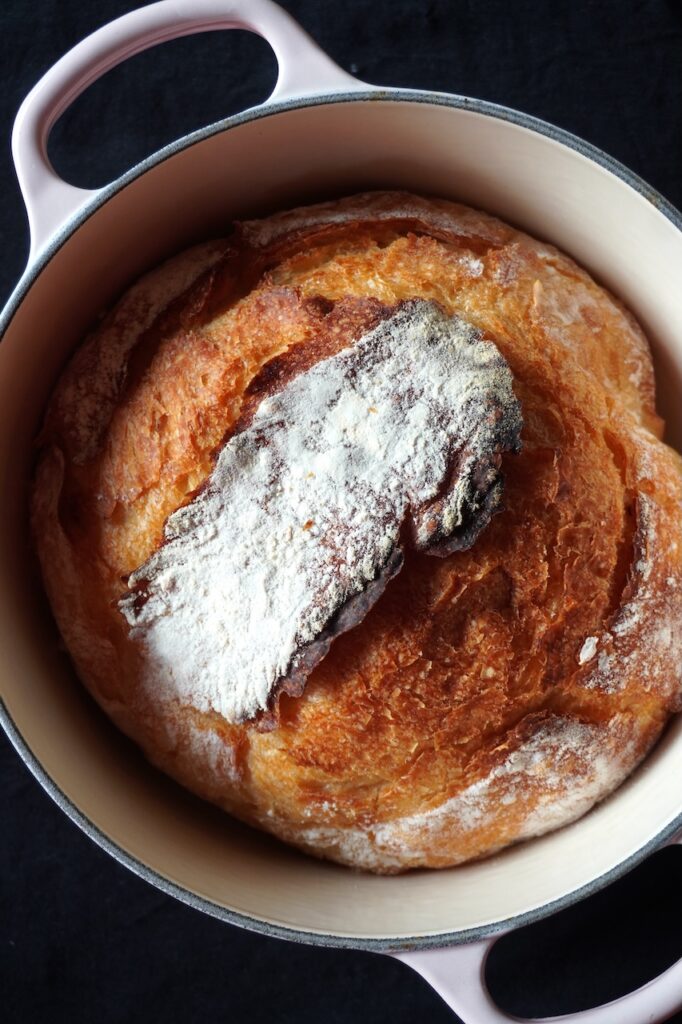
It is baked in a dutch oven, which gives the iconic crusty and chewy texture and open pores. This bread is so popular because it gives artisan look with very little effort.
You can serve this bread with soups of choice or make sandwiches. It tastes great toasted in olive oil or butter and served with scrambled eggs or turned into avocado toast or avocado egg toast.
Similar Recipes

Tips I Learned so Far
I have made this no knead bread many times. I have changed ratios of flour to water, tried different techniques and found out that this is the best recipe. Yes it involves baby sitting the dough, but that is the beauty of making bread at home. For me it is almost therapeutic.
You make this bread on a weekend and I am telling you, the day is well spent. Also you get to eat fresh bread for dinner. Over the years of bread baking, Here are few of my suggestions and tips.
Always use a kitchen scale, so you can never mess up with the ratios. Follow the recipe and have patience. When you make the dough, you will feel it is too sticky or not coming together. Trust me, it will work, trust the process!
The reason why this bread works is because of the process. Unlike sour dough bread this is not made with starter, so the bread rise instantly.
Doing few sets of stretch and fold helps remove uneven gas bubbles formed in the dough because of the yeast and distributes the gas evenly. So you get even pores through out the bread.
Stretching the dough also helps strengthen the gluten in the dough and makes the bread more chewy, soft and rustic.
Artisan Looking Dutch Oven Bread
If you love baking bread, I strongly recommend investing in a dutch oven. It is very helpful and gives you perfect result every time. You can get different dutch oven at many price ranges easily. It is pretty affordable too.
Artisan bread need dutch oven for getting the proper look and texture. Baking bread in a dutch oven helps steam trap in the pot which makes the bread rise and get chewy texture.
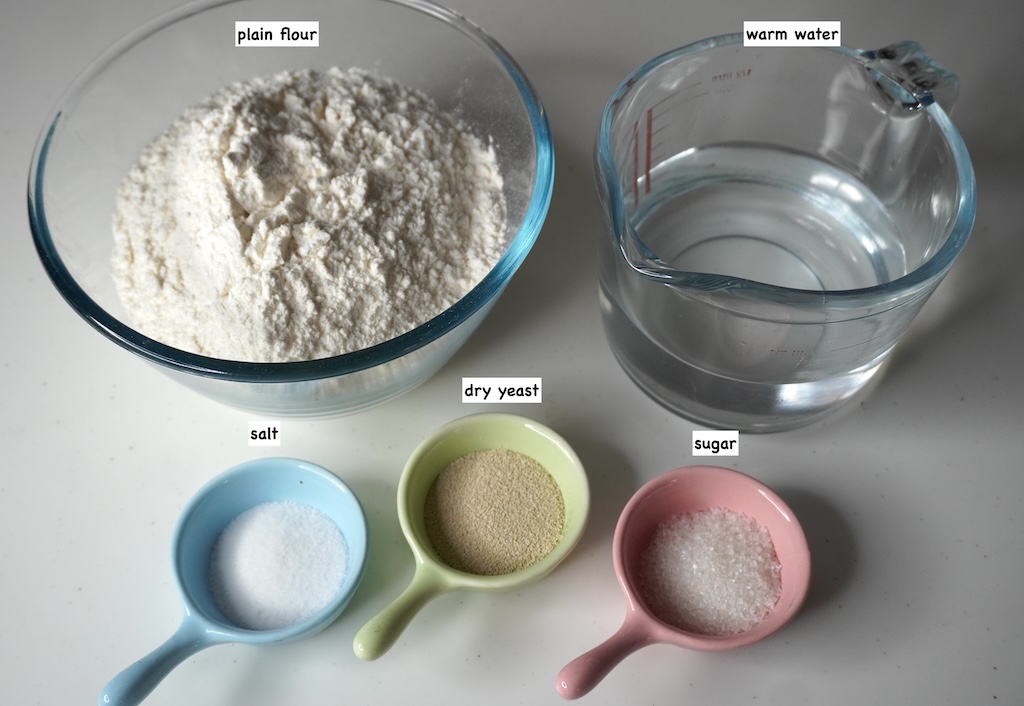
Ingredients
- All Purpose Flour – all-purpose flour contains more protein than whole wheat flour which helps the bread get crusty, soft and chewy. You can also use bread flour for better texture.
- Dry Yeast : activate yeast first before proceeding with the recipe. You can use either instant or active dry yeast, but I recommend dry yeast.
- Sugar – a small teaspoon of sugar helps feed the yeast and activate it. Honey can be used instead of sugar.
- Salt – you can never skip salt, it enhances the taste and over all flavour of the bread.
- Water – use Luke warm water to make the dough rise and soft. if you use hot water, then it may kill the yeast.
Step by Step Pictures
Activating yeast
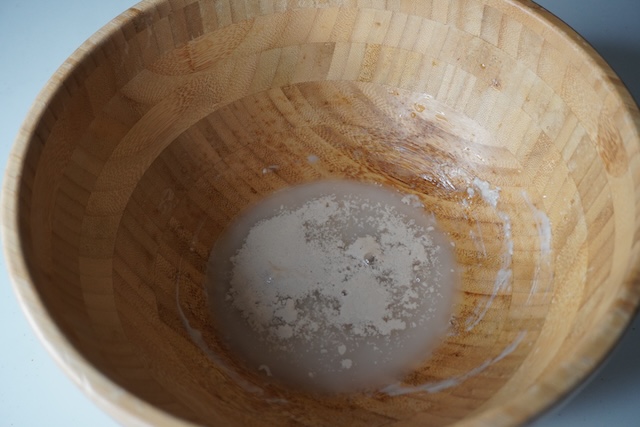
1)Take a large mixing bowl. Pour in 100 ml of warm water in the bowl. Sprinkle the sugar and yeast into the water.
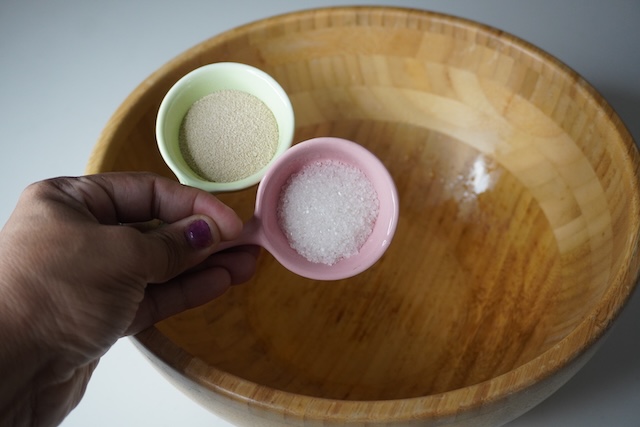
2)Let the yeast sit and activate for couple of minutes. It will get foamy and bubbly.
Make Dough
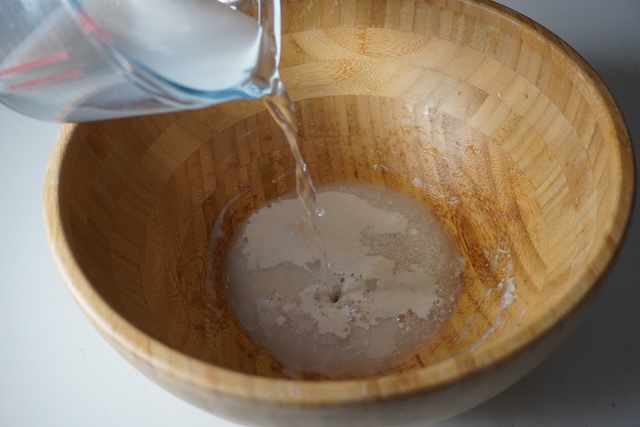
3)Now pour the remaining water into the bowl and mix well.
4)Now add in plain flour, salt into the yeast water.
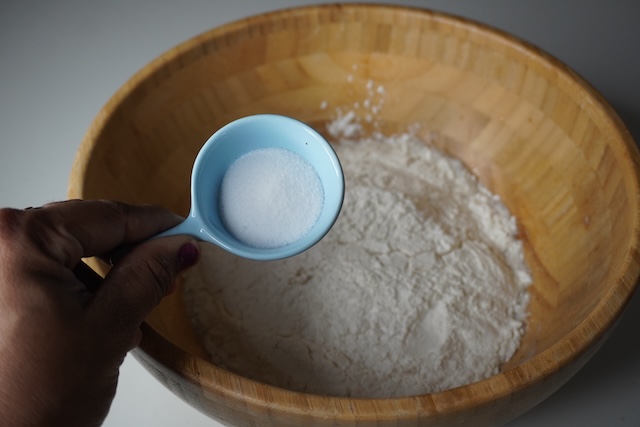
5)Mix this using a spatula until all the flour is mixed into the water and the flour is well hydrated.
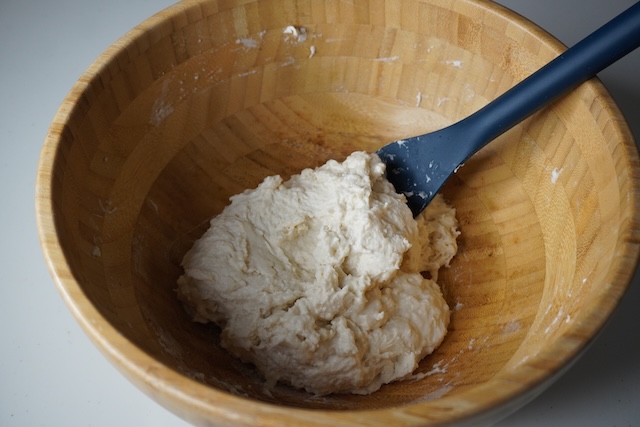
First Proof
6)Just bring the dough together like this, The dough will be shaggy and slightly sticky. It shouldn’t be too sticky, if it looks too sticky add more flour and mix. No need to knead the dough.
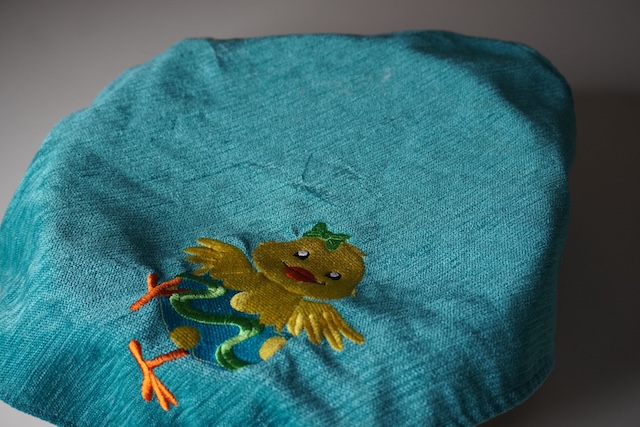
7)Cover the bowl with a kitchen towel and set aside for 30 minutes to rise.
Stretch and fold
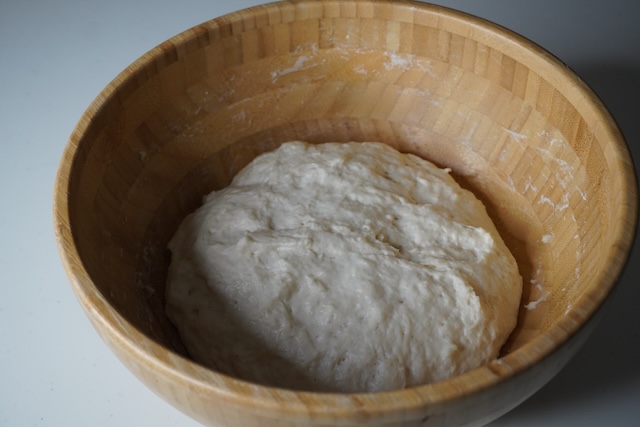
8)After 30 minutes, the dough would have risen.
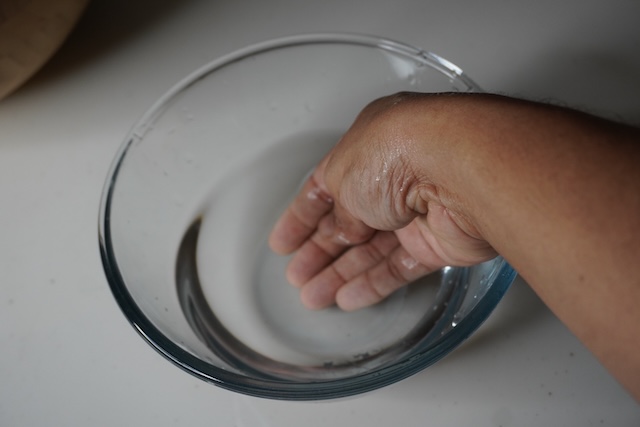
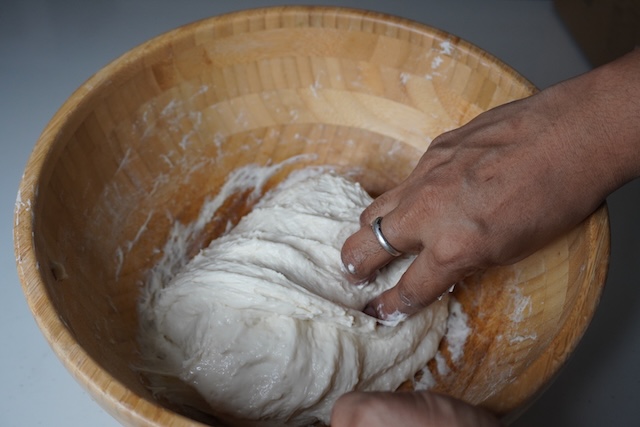
9)Wet your hands with water, use your damp hands to do the first set of stretch and fold.
10)Gently pull the dough from one side to a height.
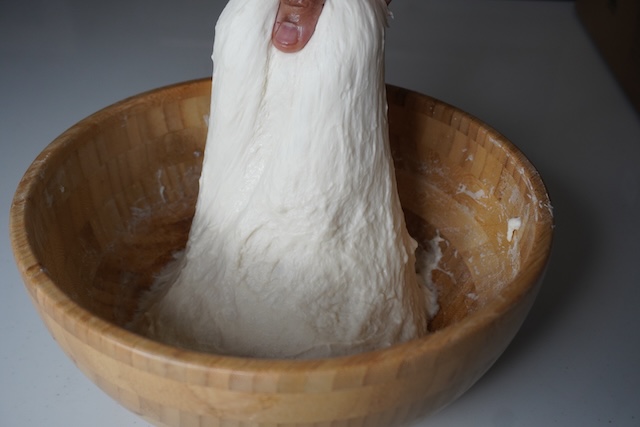
11)and fold back to itself in the centre.
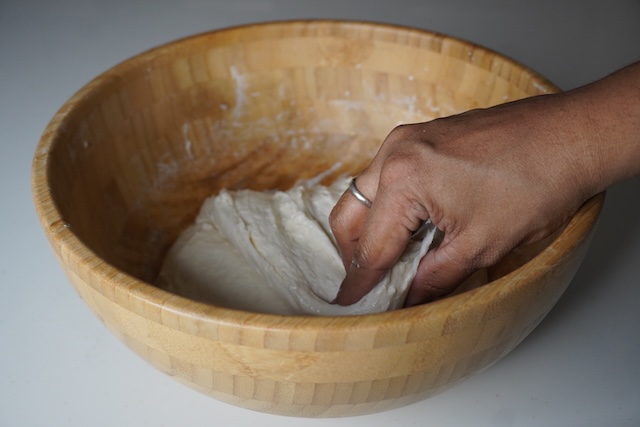
12)Rotate the bowl, pull the dough again to a height.
13)Fold back to itself. Now turn the dough again and repeat the same. Do it a total of 4 times.
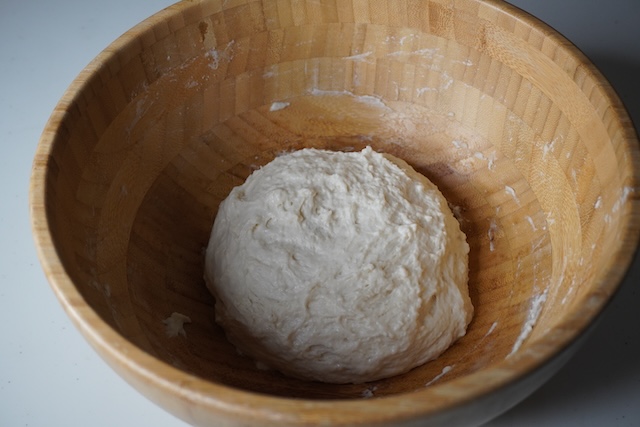
14)Tuck the dough so it forms into a ball like. Cover again and rest for another 15 to 20 minutes.
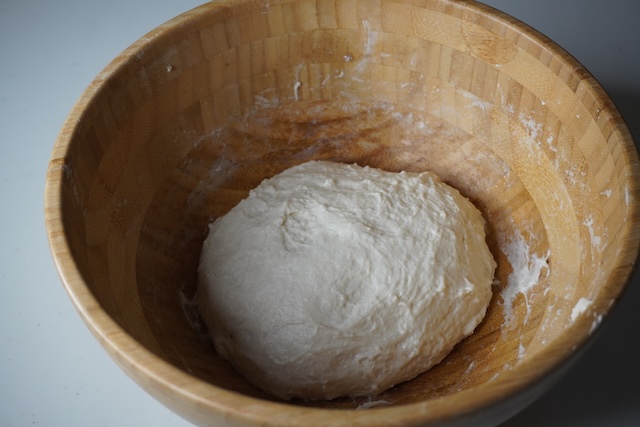
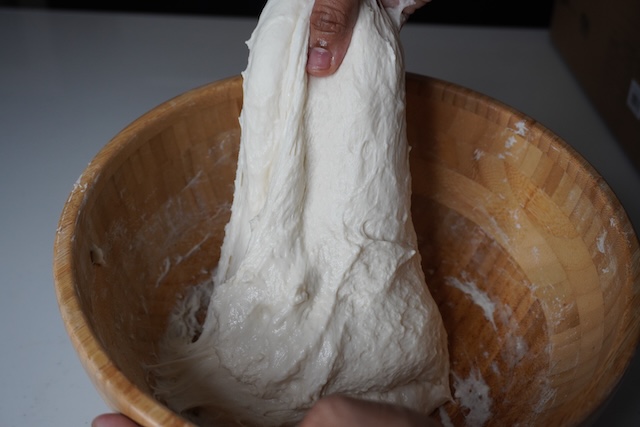
15)Repeat this two more times at 20 minute intervals. As you keep doing stretch and fold, the dough will get more elastic and gluten will develop. This is after 3rd stretch and fold. After the 3rd stretch and fold, cover the bowl with kitchen towel and allow it to rest for 30 to 40 minutes.
Preheating Dutch oven
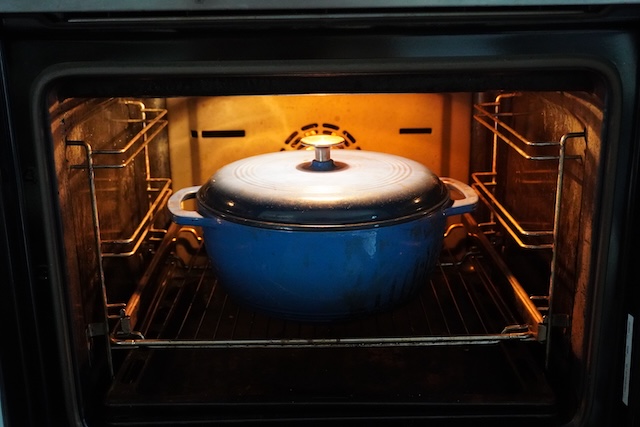
16)Meanwhile take a Dutch oven, place it into the lower rack of oven. Preheat the oven at 220 degree c (440 degree F) with the Dutch pan with lid inside. It should preheat for at least 30 minutes to 40 minutes to get it well heated.
Shaping Dough
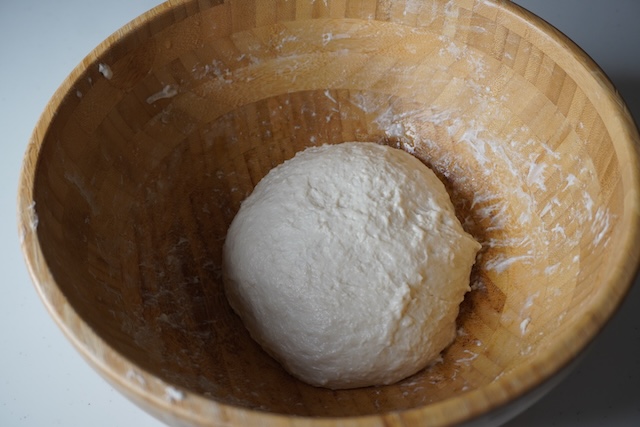
17)Now after 30 minutes the dough has risen well and proofed.

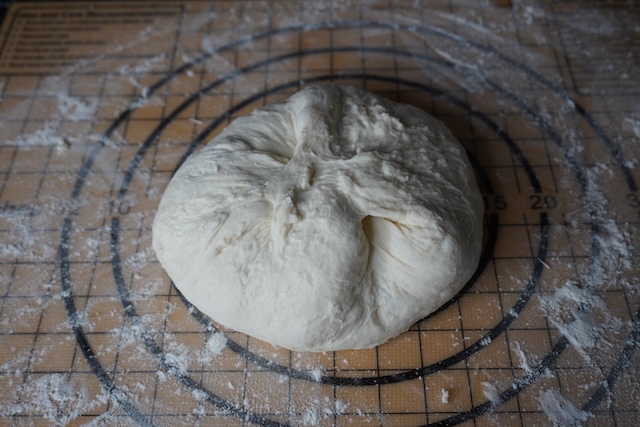
18)Take a silicon mat or use a clean work surface. Sprinkle the surface with plain flour. Transfer the dough onto the surface by inverting the bowl. The dough will fall into the floured work surface.
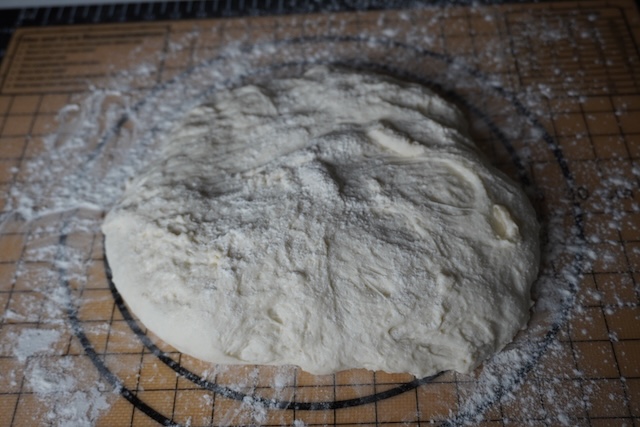
19)Now bring the edges into the center and shape it into a dough ball like. Seal the dough really well.
Final proofing
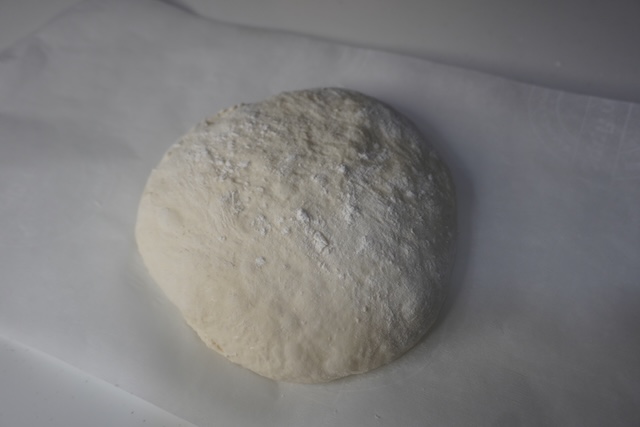
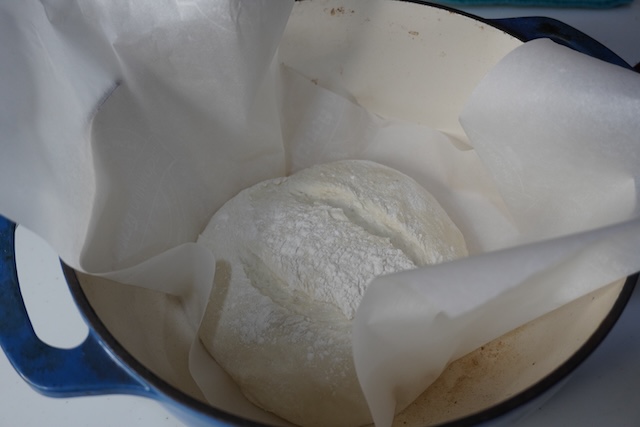
20)Take a parchment paper, dust it with parchment paper. Gently lift the ball and Place the dough ball on a floured parchment paper seam side down. Let the dough rest for 10 minutes.
Scoring Bread
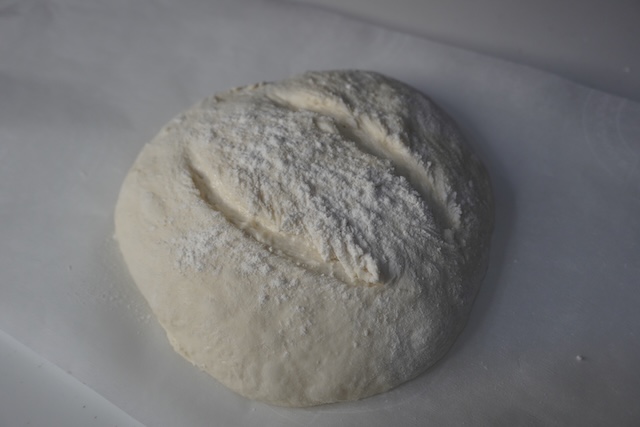
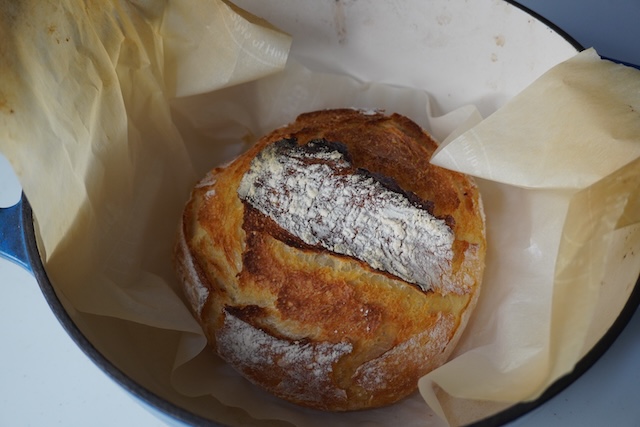
21) Use a sharp knife or blade to score the bread. This helps the bread bloom when baking.
Baking bread
22)Remove the Dutch oven from oven, Now open the dutch oven lid. Place the bread into the Dutch oven.
23)cover the lid and place it back into the oven. let it bake for 30 minutes on 220 degree c oven covered. After 30 minutes, open the lid of the casserole and bake without lid for 15 minutes. The bread should get a dark golden colour on top.
Cool & Serving
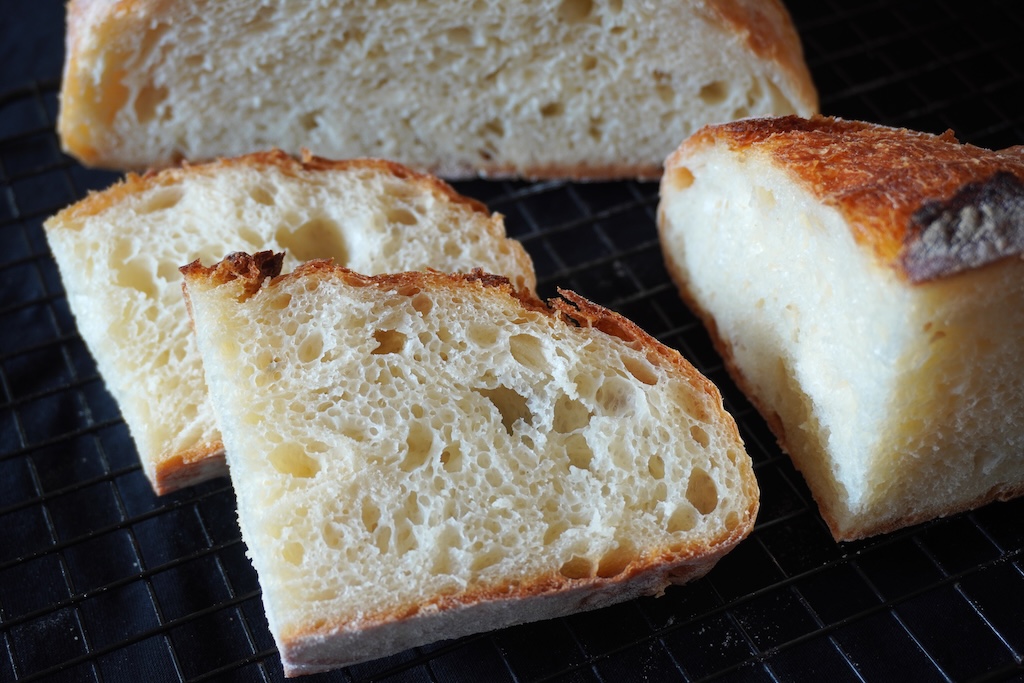
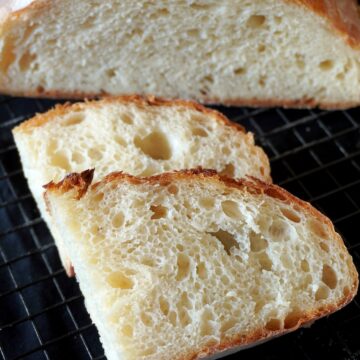
24)Remove from oven, gently remove the bread from the Dutch oven and place it on a wire rack and allow it to cool completely.
25)Once cooled, slice and serve.
Expert Tips
Temperature of Water – the water temperature is very important when making the bread dough. Use lukewarm water 100-110 degree F (38-43 degreeC) is perfect for making bread.
Using right measurement – using kitchen scale to measure flour and water is best. Right quantity of water is required to make the dough. Else the dough will be too sticky.
Stretch and folds – do a minimum of three stretch and fold to strengthen the gluten in the dough. It helps create structure in your bread and make it more rustic. It also helps create much even pores throughout the bread.
Preheating dutch oven – since the bread is baked in a dutch oven, it is important to preheat dutch oven at least 30 to 40 minutes. This ensures your dutch oven is super hot when you put the bread in which helps with beautifully baked bread.
Baking – you have to bake the bread for 30 minutes covered and 15 minutes uncovered for proper crusty texture and look.
Serving & Storage – you can serve this bread almost with anything from soups, make toasts, sandwiches. Wrap the bread with plastic wrap and store at room temperature upto 2 to 3 days. Slice the bread, and freeze upto 3 months.
FAQ
You can try baking this bread in a deep oven safe pan covered with foil. But dutch oven or any cast iron covered pan is great for baking this bread.
Yes you can use half whole wheat flour and half plain flour in this recipe. Using completely whole wheat flour may affect the texture of the bread.
You can mix the dough and let it bulk ferment for 2 hours and bake straight away. But doing multiple stretch and folds help strengthen the gluten and gives beautiful texture to the bread.
📖 Get Recipe
Easy No Knead Bread Recipe (Artisan, Crusty Bread)
I think Everyone needs a good no knead bread recipe on their Repitore, which is easy to make, doesn’t need any efforts, takes less time to make. This no knead bread is your answer. This professional looking Artisan bread has open pores, tastes great and is easy to make. Let me guide you step by step in making this no knead bread so you can bake great fool proof bread easily at home.
Instructions
-
Activating yeast – Take a large mixing bowl. Pour in 100 ml of warm water in the bowl. Sprinkle the sugar and yeast into the water. Let the yeast sit and activate for couple of minutes. It will get foamy and bubbly.
-
Make Dough – Now pour the remaining water into the bowl and mix well. Now add in plain flour, salt into the yeast water. Mix this using a spatula until all the flour is mixed into the water and the flour is well hydrated.
-
First Proof – The dough will be shaggy and slightly sticky. It shouldn’t be too sticky, if it looks too sticky add more flour and mix. No need to knead the dough. Cover the bowl with a kitchen towel and set aside for 30 minutes to rise.
-
Stretch and fold – After 30 minutes, the dough would have risen. Wet your hands with water, use your damp hands to do the first set of stretch and fold. Gently pull the dough from one side to a height and fold back to itself in the centre. Rotate the bowl and do 4 set of stretch and fold on the dough. Tuck the dough so it forms into a ball like. Cover again and rest for another 15 to 20 minutes.
-
Bulk Ferment – Repeat this two more times at 20 minute intervals. As you keep doing stretch and fold, the dough will get more elastic and gluten will develop. After the 3rd stretch and fold, cover the bowl with kitchen towel and allow it to rest for 30 to 40 minutes.
-
Preheating Dutch oven – Meanwhile take a Dutch oven, place it into the lower rack of oven. Preheat the oven at 220 degree c (440 degree F) with the Dutch pan with lid inside. It should preheat for at least 30 minutes to 40 minutes to get it well heated.
-
Shaping Dough – Now after 30 minutes the dough has risen well and proofed. Take a silicon mat or use a clean work surface. Sprinkle the surface with plain flour. Transfer the dough onto the surface by inverting the bowl. The dough will fall into the floured work surface. Now Bring the edges into the center and shape it into a dough ball like. Seal the dough really well.
-
Final proofing – Take a parchment paper, dust it with parchment paper. Gently lift the ball and Place the dough ball on a floured parchment paper seam side down. Let the dough rest for 10 minutes.
-
Scoring Bread – Use a sharp knife or blade to score the bread.
-
Baking bread – Remove the Dutch oven from oven, Now open the dutch oven lid. Place the bread into the Dutch oven. cover the lid and place it back into the oven. let it bake for 30 minutes on 220 degree c oven covered. After 30 minutes, open the lid of the casserole and bake without lid for 15 minutes. The bread should get a dark golden colour on top.
-
Cooling & Serving – Remove from oven, gently remove the bread from the Dutch oven and place it on a wire rack and allow it to cool completely. Once cooled, slice and serve.
Nutrition
Nutrition Facts
Easy No Knead Bread Recipe (Artisan, Crusty Bread)
Amount per Serving
% Daily Value*
* Percent Daily Values are based on a 2000 calorie diet.